-
Home
-
Course
-
Introduction to Java
-
JDK installation and configuration
JDK installation and configuration
Friday, December 1, 2023
In this article, you will learn how to set up the Java development environment for Windows, macOS, or Linux systems. You will discover the steps to install the Java Development Kit (JDK) and verify that the Java installation is successful.
This article will help you prepare your system so that you can start developing software harnessing the capabilities of Java.
Prerequisites
Before configuring the Java development environment on Windows, macOS, or Linux, it is essential to ensure that your system meets some prerequisites.
1. Updated Operating System:
Make sure your system is updated to the latest available version. Keeping your operating system up-to-date is crucial to ensure compatibility and optimal performance with Java development tools.
2. Internet Connection:
An internet connection is necessary to download the Java Development Kit (JDK). Ensure that your connection is stable to avoid interruptions during the download and installation process.
Java Development Kit (JDK) Installation
The Java Development Kit, commonly known as JDK, is an essential component for Java application development.
The JDK provides the necessary tools to compile, run, and debug Java source code.
Below, we will explain how to download and install JDK 2, the latest Long-Term Support (LTS) version of the Java SE platform that will receive updates under the NFTC until September 2026, one year after the release of the next LTS.
JDK Installation on Windows
Step 1: Download the JDK 21 for Windows from the official Oracle website.
Step 2: Once the installation file is downloaded, run it. The installation wizard will guide you through the process.
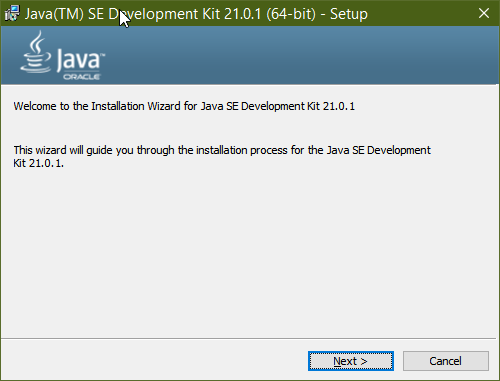
Step 3:
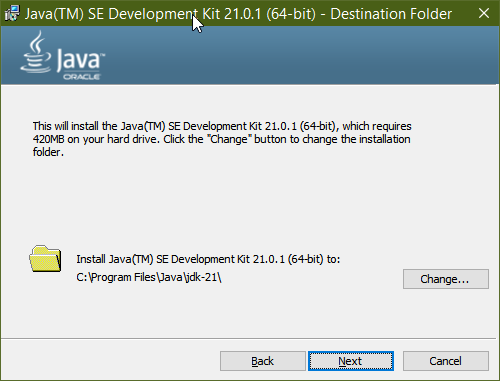
Step 4:

Step 5:

Step 6: After completing the installation, verify that the JDK has been installed correctly. To do this, run the following command in the Windows console:
You should see information about the version of Java you have installed.

JDK Installation on macOS
Once you have downloaded the Java Development Kit (JDK) installer on your Mac system, it's time to proceed with the installation. Follow these steps to complete this process:
1. Running the Installer:
Open the downloads folder or the location where the JDK installation file, usually a DMG file, is saved. Double-click the file to mount it.
2. Starting the Installer:
Once the DMG file is mounted, you'll see a new volume on your desktop containing the installer. Open that volume and look for the file with the ".pkg" or ".dmg" extension corresponding to the JDK. Double-click that file to start the installer.
3. Admin Authentication:
The installer will require you to enter your admin password to proceed. Provide the credentials when prompted.
4. Installation Process:
The JDK installer will guide you through the installation process. Make sure to review the information displayed on the screen and follow the provided instructions.
5. Installation Confirmation:
Once the installation process is complete, you will receive confirmation that the JDK has been successfully installed on your Mac.
6. Checking the Installation:
To verify that the installation was successful, you can open the Terminal and run the following command:
java -version
You should see information about the version of Java you have installed, confirming that the JDK is available and functioning on your system.
JDK Installation on Ubuntu
In Ubuntu, the JDK can be installed through the package management system. Run the following command to install the latest version of the JDK:
sudo apt install default-jdk
Installation Verification
Once the installation is complete, verify that the JDK has been installed correctly. You can do this by running the following command:
java -version
You should see information about the version of Java you have installed, confirming that the installation was successful.
Share it
Share it on your social media and challenge your friends to solve programming problems. Together, we can learn and grow.
Copied
The code has been successfully copied to the clipboard.